Why the Right Accessories Make Errands with Kids Easier
Did you know a well-equipped e‑bike trip can turn a stressful outing into a smooth, enjoyable adventure for the whole family? We love the freedom of running errands by e‑bike with our kids, but doing it safely and comfortably takes some planning.
In this short guide we’ll highlight accessories that boost safety, weather protection, carrying capacity, and on‑the‑go comfort. These essentials help us prioritize gear so family errands feel manageable and fun — from secure seats and trailers to lights, locks, and little comforts that keep kids happy.
We’ll focus on practical, tested picks that fit real family routines and budgets.
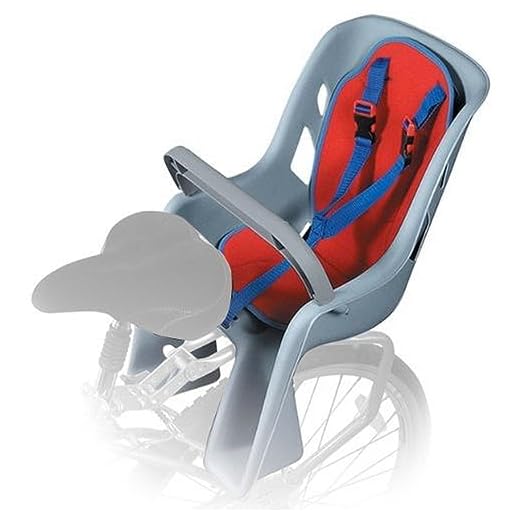


A Secure, Comfortable Child Seat
Types and what suits your family
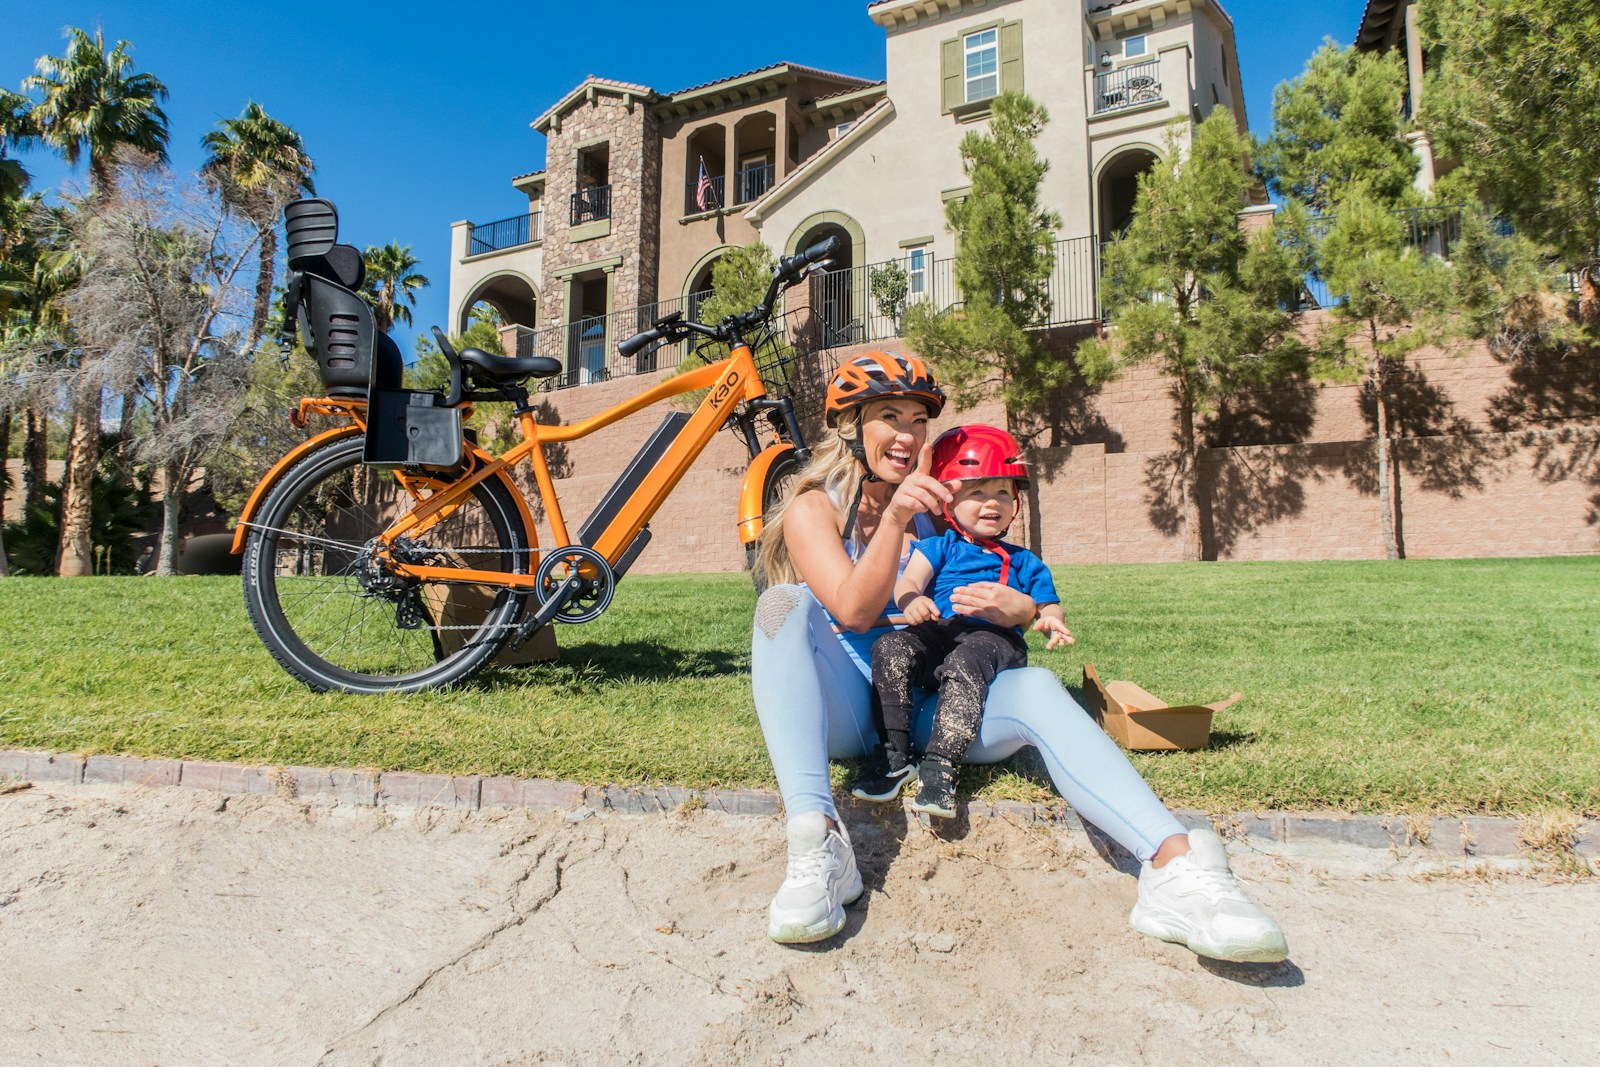
A robust child seat is the foundation for carrying young children on an e‑bike. Rear‑mounted seats (Thule Yepp Maxi, Hamax) give a lower center of gravity and often higher weight limits; front‑mounted (Yepp Mini, front racks) keep your child in sight and are great for short rides. Choose based on bike geometry and how involved we want the child to be in the ride.
Harnesses, limits, and comfort
Most high‑quality seats are rated to about 22 kg (≈48 lb) and specify minimum head/neck control — follow those limits. Look for 5‑point or 3‑point harnesses, padded shoulder straps, adjustable footrests, and a slight recline for naps. Ventilation channels and washable liners make daily use nicer.
Quick installation & fit checklist
- Confirm seat model is compatible with our frame or rack; test-fit before placing the child.
- Tighten mounting bolts to manufacturer torque specs; use thread locker if recommended.
- Adjust harness so we can fit only one finger between strap and collarbone.
- Position footrests to prevent toes from reaching the wheel; secure straps around ankles.
For older toddlers vs. preschoolers: toddlers need higher back support and a snugger harness; preschoolers benefit from more legroom and reclining for longer errands. Next, we’ll look at trailers when we need larger capacity or extra weather protection.
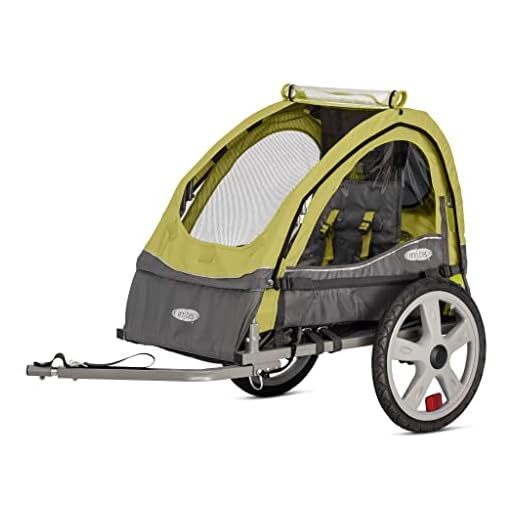
Child Trailer for Extra Capacity and Protection
Single vs. double trailers: picking the right size
When we need to carry more than one child or bulky groceries, a trailer is a game‑changer. Singles like the Burley Bee are nimble for quick runs; doubles such as the Burley Cub or Thule Chariot Cross give room for two kids or a week’s worth of shopping and often convert to stroller use. Think about storage space, doorway clearance, and whether we want stroller conversion.
Low, stable load and real‑world handling
Trailers sit low and behind the bike, which keeps the center of gravity down and reduces steering twitch compared with top‑loaded panniers. On windy days we notice trailers track predictably — but they do add length, so allow extra stopping distance and wider turns.
Safety checks & everyday maintenance
- Check hitch tightness and attachment points before every ride.
- Inspect axle nuts, bearings, and tire pressure weekly; replace worn tires promptly.
- Use a tall visibility flag, side reflectors, and a rear light for dusk runs.
- Secure kids with the trailer’s harness and add a padded blanket for naps.
A trailer can also double as a cozy nap or play space during longer errands — bring a small blanket and sunshade to make waiting time comfortable for everyone.
Sturdy Cargo Rack and Locking Box or Panniers
Choose a weight-rated rack
When we’re hauling groceries and gear, a heavy‑duty rear rack built for e‑bike torque is essential. Look for racks marketed as e‑bike compatible (higher load ratings and reinforced mounts). Popular choices include Tubus Cargo, Topeak MTX, and Thule Pack ’n Pedal for real-world durability.
Quick‑release vs. bolted systems
Quick‑release racks and bags make swaps easy for quick errands, but bolted mounts feel rock‑solid under heavy loads. If we frequently carry kids’ snacks and full grocery bags, we lean toward bolted or reinforced QR systems.
Waterproof, insulated panniers
Ortlieb Back‑Roller and Thule Shield panniers keep perishables dry; insulated liners are a game‑changer for milk and frozen items. Hard‑shell top boxes protect fragile items like eggs or a laptop.
Practical packing & locking tips
- Balance weight left/right; put heavy, dense items low and centered.
- Use a top box for fragile or frequently accessed items.
- Add a small cable lock or pannier locks to deter opportunistic theft.
Next, we’ll look at helmets and protective gear so our kids ride safely while we carry the load.
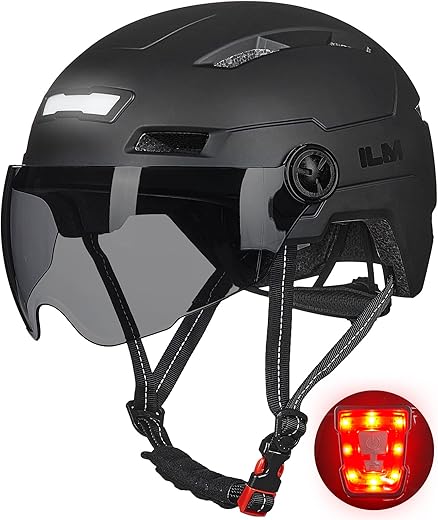
Proper Helmets and Protective Gear for Kids
Fit basics: how we check a helmet
A helmet is non‑negotiable — but fit matters as much as brand. We check that it sits level on the forehead, the front edge is about two finger‑widths above the eyebrows, and the straps form a V just below the ears. It should feel snug without pinching; use the dial or retention system to fine‑tune.

Features worth paying for
- Adjustable retention dial (keeps fit as they grow)
- Removable, washable liners for hygiene and small size tweaks
- MIPS or similar impact tech for older kids on faster routes
- Built‑in reflectivity or high‑visibility stickers for low light
- Small visor to keep sun and rain out of eyes
Extras and routines that help
For very wobbly riders, lightweight knee and elbow pads (e.g., Bell or Fox youth sets) add confidence. Make helmet time positive: let kids pick stickers, try them on during TV bike scenes, and stow a favorite hat or toy in the helmet bag. That little ritual turns safety into habit.
Next up: smart ways to keep kids dry, warm, and comfortable — rain covers, windshields, and clothing gear.
Weather Protection: Rain Covers, Windshields, and Clothing Gear
Child rain covers vs umbrella‑style shields
Bad weather shouldn’t cancel errands — but choosing the right shield matters. Full rain covers for child seats and trailers (think Burley or Thule-style enclosed canopies) keep spray and wind off little faces and shopping alike; umbrella‑style shields might be OK for light drizzle but let in sideways rain and cold. We opt for full covers on fast rides or windy days, and a simpler shield for quick, local trips.

Ventilation to prevent condensation
Look for covers with zippered vents or mesh panels. We’ve learned the hard way: a sealed canopy fogs up on cool rides. Open vents near the top to let warm, moist air escape while still blocking rain.
Compact rain gear and quick‑dry layers
Pack lightweight, fast‑dry layers for kids and adults — a merino base, thin fleece, and a waterproof shell. Keep a small stash in a pannier or trailer that won’t add bulk.
- Quick packing checklist: thin waterproof jacket, foldable poncho, spare socks, microfibre towel
These choices keep errands moving when clouds roll in, without turning our bike into a storage nightmare.
Secure Harnesses, Tow Straps, and Cargo Tie-Downs
Harness types and when to use them
For child seats and trailers we favor 5-point harnesses (shoulders, hips, crotch) for toddlers and padded 3-point or adjustable 5-point systems for older kids. Brands like Hamax and Burley use easy-release buckles that still resist jostling — choose one with wide straps and clear size settings.
Quick pre-ride check routine
Before every trip we run a 30-second check:
- Pull each strap to ensure it’s snug (no more than a finger’s width slack)
- Verify buckles click and sit flat against clothing
- Confirm shoulder straps aren’t twisted
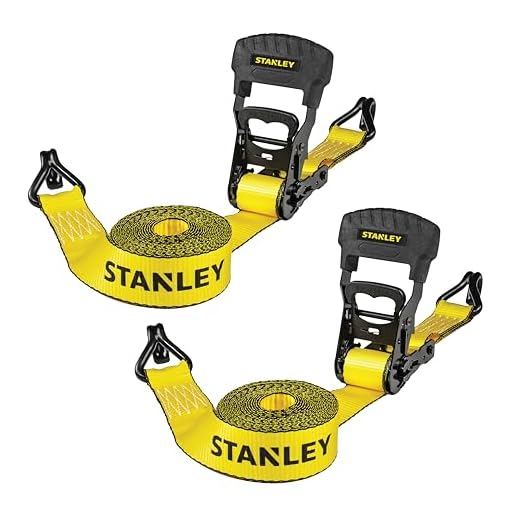
Securing cargo: straps vs bungees
Use ratchet or cam straps for heavy, irregular loads and bungee nets for light grocery bags and soft parcels. We pair two straps across a load (not one) and tension evenly to prevent shifting.
Common mistakes to avoid
- Overloading racks beyond rated capacity
- Tying only on one side (causes uneven weight and wobble)
- Relying on worn straps — replace frayed gear immediately
With secure harnesses and proper tie-downs, our rides feel steadier and safer — next we’ll make sure others can see us coming with the right lights and reflectors.
Lights, Reflectors, and High-Visibility Flags
Light types & mounting
Visibility is the simplest safety upgrade. We pick a bright front beam (200–600 lumens for mixed urban/dusk errands) and a rear light with steady and flash modes — steady for approach, flashing for attention. Good picks: Bontrager Ion/Flare combos or Lezyne Strip Drive. Mount the front high on the handlebars and the rear on the rack or seatpost so drivers see us from behind.
Reflectors and reflective trim
Add spoke or wheel reflectors and adhesive reflective strips to helmets, panniers, and kid seats. Reflective tape on the rear of a locking box or trailer makes a big difference at night.
Flags and long loads
For trailers or long cargo (skateboards, lumber) use a 2–3 ft high fluorescent flag and extra rear reflectors or chevron plates. Brands like Burley sell trailer flag kits that really improve sightlines.
Quick visibility checklist
- Front light (steady + flash)
- Rear taillight and extra reflectors
- Wheel/spoke reflectors and helmet strips
- Tall fluorescent flag for trailers
Charging habit
We check batteries before trips, charge USB lights overnight, and carry a small power bank to avoid unexpected outages.
A Stable Kickstand or Parking Solution
Double-leg vs. center stand
A sturdy kickstand is one of the simplest upgrades that prevents disastrous tip-overs when we load kids and cargo. Double-leg (dual-leg) stands open into a stable tripod with the rear wheel lifted slightly — great for quick stops and uneven loads. Heavy-duty center stands (the kind fitted on many cargo e-bikes) sit under the frame and offer rock-solid support for very heavy loads.
When to use a parking prop or adapter
If we park on soft ground or need extra clearance, a removable parking prop or rack adapter can stabilize the bike without modifying the frame. Brands like Hebie and Pletscher make dependable double-leg and center-stand options commonly used on family e-bikes.
Practical tips for safe loading
- Park on level ground and point the handlebars straight.
- Use a wheel chock, small board, or partner to steady the front wheel.
- Keep the stand fully deployed before unbuckling kids.
- For long errands, lock the bike to a post or sturdy rack while loading.
With a stable base, unloading becomes calmer — next we’ll cover tools to keep us rolling if something goes wrong on the ride.
Portable Repair Kit, Pump, and Spare Parts
What’s in our compact kit
Flat tires or a loose bolt can stop an errand fast. We carry a small kit with everything to get rolling again:
- Mini pump (Topeak Road Morph or Lezyne HV Micro) or CO2 inflator (Genuine Innovations)
- Tire levers (Park Tool TL‑1)
- Patch kit (Park Tool GP‑2) and/or tubeless plug kit (Dynaplug)
- Multi‑tool (Crankbrothers M19 or Topeak Alien II)
- One or two spare tubes sized to our wheel and valve type (Presta vs Schrader)
Pump vs CO2 — quick note
A pump is reliable and reusable; CO2 is fast for solo parents with wiggly kids. We often carry both when space allows.
Storing and quick checks
We stash the kit in a small saddle bag, strap‑on top tube bag, or inside a pannier so it’s always reachable. Before every trip we check tire pressure, brake feel, and battery charge — those three checks prevent most stops.
Teaching kids basic safety checks
Older kids can learn to press tires, squeeze brakes, and read battery lights; involving them builds confidence and keeps errands smoother.
Next up: small comforts that keep kids happy on the ride.
Comfort and Entertainment: Cushions, Footrests, and On-the-Go Toys
Soft seating that’s easy to clean
Happy kids make errands smoother. We prefer removable, padded liners and cushions (look for options from Hamax, Thule, or universal gel pads) that clip on and wash easily. A thin memory-foam liner can turn a bumpy 20‑minute ride into a nap-worthy trip without adding bulk.
Keep legs supported
Properly positioned footrests prevent dangling legs and distracted wiggling. Adjustable foot platforms or strap‑on rests from brands like Bobike or Hamax work well as kids grow. We set them so knees are slightly bent and straps are snug but comfortable.
Quiet toys, snacks, and smart organizers
Distraction is key—but safety comes first. We pack:
- Small, quiet toys on short straps (soft books, silicone teething shapes)
- A spill‑proof snack box (Yumbox or reusable silicone bags) and a compact wet‑wipe dispenser
- A handlebar or pannier organizer with divided pockets for snacks, wipes, and a spare shirt
Avoid loose items that can fall toward wheels; clip toys and use zippered pouches. On a rainy afternoon, we’ve seen a magnet drawing board save an entire grocery run—simple, calm, and convenient.
Next up: putting all these accessories together for easier family errands.
Putting It All Together for Easier Family Errands
With a thoughtful combination of safety, storage, weather protection, and comfort accessories, we can turn e-bike errands with kids into a reliable, pleasant routine. We should prioritize a few high-impact items first—secure seating, visible lighting, and dependable cargo solutions—and then build our kit gradually to match our family’s needs and routes.
A little preparation goes a long way toward stress-free, joyful trips. Start with the essentials, add comfort and backup gear over time, and enjoy the freedom of running errands together. Let’s get out there and make family mobility greener and happier. Come kit up and ride with confidence today.